
Our Spring 2022 Retreat is scheduled from Friday, March 11th, to Sunday, March 12th, with an option to add Thursday evening at the Stone Castle Hotel & Convention Center in Branson, Missouri. For the latest updates join our Facebook page, Croppin' Train Retreats and Hobby House.
Saturday, December 29, 2012
Saturday, November 3, 2012
2 Katie Design Class for Fall Retreat
There are only 23 seats available for this class. Pre-register now before they are SOLD OUT.

Echo Park, Everyday Eclectic line
Thursday, October 25, 2012
Wendy Senger

Wendy Senger, the creator of Tattered Angels Glimmer Mist, will be doing a demo at the Fall Retreat on November 10th. She will be sharing her knowledge of Glimmer Mist, Glimmer Glam and some new products you cannot create without.
This retreat has only one opening left. For those of you signed up, we are very excited for you. You don't want to miss this.
Tattered Angels is one of Dora's favorite products. Having this celebrity at our event is so, so amazing.
Monday, October 1, 2012
Fall Retreat
We are almost sold out for the Fall Retreat. There are two spots left. Please email us before paying to ensure we have room for your group.
We are so excited for the things we have "up our sleeve" for you... activities, special guests and more.
Keep croppin'
We are so excited for the things we have "up our sleeve" for you... activities, special guests and more.
Keep croppin'
Sunday, July 29, 2012
Miscellaneous Musings
Gosh! What happened to the month of July?!?
August will be here in just a few days, and, along with it, the beginning of school! If you're in Arkansas, remember that August 4 and 5 are "tax free" days in Arkansas. Be sure and check the details, as not everything is tax free.
If you live in Northwest Arkansas, you're probably familiar with the annual "Best of Northwest Arkansas" contest. If you're voting in the contest, we would like to ask you to vote for "Croppin' Train Scrapbook Retreat" for the "Best Weekend Get-Away" in the "Entertaiment" section. There is a complete ballot included in the Sunday paper, or you can enter online at nwaonline.com/best. Voting closes tomorrow, July 30.
Our final Croppin' Train Express event of the summer will be Saturday, August 4, at the Benton County Public Works building (formerly the Health Dept)on Hwy 102 in Bentonville. We will throw the doors open at 9:00 a.m. The building is air conditioned, so we can all enjoy a comfortable day of scrapbooking. We still have some empty seats, so if you need more details about this event, please contact us by phone (479-531-8518) or email (croppintrain@aol.com).
If you've read the July 9 posting, you'll see where Dora undertook the enormous task of organizing YEARS worth of digital photos - congratulations! I wanted to add a suggestion for those of you that are considering the same type of task. Because I've had 2 external hard drives crash, and lost everything that was on one of them, I don't like to keep all of my pictures in one place. I started buying 8GB and 16GB thumbdrives when they're on sale (like now!). I put all my pictures for one year on a separate thumbdrive. Most years, I can get by with an 8GB, but, if we had a wedding, a big vacation, or something else very special, I'll use a 16GB. For the older years, I've tried to at least create a subfolder for each month, and file the pictures accordingly. A couple years ago, though, I started creating both monthly and specific folders. I have specific folders for each person's birthday and one for each holiday. I haven't yet gone to the detail that Dora has, with reviewing what I've printed, scrapbooked, etc., but that is a great idea and one that I definitely need to do.
Has anyone NOT been on PINTEREST yet? I fear I could live there some days! There are some really great ideas with links to specific websites, blogs, etc. The "photography" category has terrific ideas for individual and family poses, clothes to wear, backgrounds, etc. Type "scrapbook" in the search box, and you'll see all kinds of layout ideas. As always, the "DIY and Crafts" category is chock-full of ideas for every crafter and every occasion.
Hope you enjoy your last few days of July, and are ready for school bells, books and bus traffic. :)
Pat
Monday, July 9, 2012
Photo Organization
I just finished a very long project. I took 8.5 years of digital pictures (that I sometimes had 3 digital copies of) and organized them by year. THEN I went through all the pages I have scrapbooked and noted those digital photos as printed. Then I went through all the pictures I have printed and begging to be scrapbooked and marked those as printed.
I have accomplished three things:
1. When their is a photo special, I can print unprinted photos.
2. I will stop printing pictures I have already printed and forgot about. (found a few LARGE groups of these). Saving money!
3. I can find photos quicker now when I am looking for that "one special one".
Also, I have a clean copy of digital photos (on my external hard drive) that I can put in the safety deposit box in case of a disaster.
I have created a habit of downloading and backing up my digital pictures each month. So I will never have to go through this again.
I feel so much better.
Sunday, June 24, 2012
Take a Spin!
I made this card for my sister-in-law's birthday earlier this month. I used the Scallop Square Bigz Clear die from Stampin' Up! for the card base. Very carefully, line up your folded card stock just UNDER one of the scallop edges, and that allows you to cut scallops on three edges, but leave the fourth uncut and folded. For the three layers, I just cut one edge of my cardstock, and then cut each piece the same width.
The fun part of this card, of course, is the stamped section! This is from the Take a Spin SU! set. I stamped the image once on white cards in blue, then on a separate piece of cardstock in red. I cut out the red-stamped image, right on the edge, and mounted that on top of the blue-stamped image. I also colored in a few of the images with a marker. BEFORE you adhere the stamped image pieces to the rest of the card, you need to add the spinner. You can get those through Stamin' Up!, too. There are three parts to the spinner - a brad, the spinner itself, and a washer. I put the brad and spinner on top, and the washer on the bottom, then used pop-dots to lift the entire stamped image from the card base.
Hope you have a great week, and get to stamp and scrap a bit!
Pat

Sunday, June 17, 2012
VACATION!
We're enjoying a fun week-end in Nashville, Tennessee! My husband, daughter and I met my brother (traveling from Montana through Ohio) in Nashville, will be here Friday and Saturday, then leave Sunday to spend the night in Memphis before heading home on Monday. We visited the Wild Horse Saloon Friday night, enjoying dinner and really good music. Saturday, we're taking a trolley tour of the city, and separate tours of the Country Music Hall of Fame and the Ryman Auditorium. We have tickets for the Opry Saturday night, seeing some older country artists - TG Sheppard, Riders in the Sky, and Little Jimmy Dickens.
Aside from the fun of visiting Nashville, it's great to spend some time with my brother - we only see him every 2-3 years, and this is the first time he's visited Arkansas since 1994! Just a quick photo of Michael (brother), Robin (daughter) and Michael (husband). Spending time with family is the best!!

Have a great week! Pat
Monday, June 11, 2012
Crop Express on June 16
We are sold out for the Crop Express on June 16th. Thank you for all your support. - Now to make the Prima goodie bags for you -
Sunday, June 10, 2012
Miss You Latte Card
I made this card for a friend that lives in another state and I hadn't heard from her in quite a while. I used a retired Stampin' Up! stamp set (What's Brewin'?), with Chocolate Chip, Sage Shadow, and Vanilla card stock. I stamped everything in Chocolate Chip ink and then heat embossed with a Clear Embossing Powder. I cut the spoon out separately and used pop dots to adhere it. I used the Ticket Punch for the corners of the Vanilla card stock - I just love that punch and use it a lot. I added the Chocolate ribbon on the bottom and the 5 brown brads to the side. On the inside (of which I forgot to take a picture!), I adhered a piece of Vanilla cardstock, stamped in Choclate with the phrase "Taking a break from the daily grind to see how you've bean!" from the stamp set. This was a really quick, easy card to do, and nice to send to a friend. Hope you all have a great week - maybe do some scrapping or stamping! :) Pat


Wednesday, June 6, 2012
Crop Express on June 16th
We just sent emails to everyone that we have signed up for the Crop Express on June 16th. If you did not receive an email from us, please let us know. We only have two spots left open for this crop.
Sunday, June 3, 2012
Happy Anniversary!
Today, June 3, would be my maternal grandparents' 80th wedding anniversary! Unfortunately, my grandfather died in 1954 and my grandmother in 2000. My grandfather was one of six children; his mother died when he was a youth, and his father was a rural mail carrier in Minnesota. My grandmother was the only girl (and the youngest child)in a family of 3 boys, so she was probably a little spoiled - even in the early 1900's. As a sidenote, my maternal great-grandparents did celebrate 79 years of marriage, before my great-grandfather passed away at the age of 100!
I love this wedding photo, and have tried to scrapbook it a dozen times (well, okay, maybe 4 or 5 times). I like each one of the attempts I've made, but have never fallen in love with any of them, so I just keep looking and trying. Following are my latest two digital attempts. I used Stampin' Up!'s "My Digital Studio" for both. I love layouts with lots of flowers and bling on them, but, when I work on a layout, it all seems foreign - like it doesn't belong, so I wind up with pretty sparse layouts.
 .
.

Have a great week!
Pat
I love this wedding photo, and have tried to scrapbook it a dozen times (well, okay, maybe 4 or 5 times). I like each one of the attempts I've made, but have never fallen in love with any of them, so I just keep looking and trying. Following are my latest two digital attempts. I used Stampin' Up!'s "My Digital Studio" for both. I love layouts with lots of flowers and bling on them, but, when I work on a layout, it all seems foreign - like it doesn't belong, so I wind up with pretty sparse layouts.


Have a great week!
Pat
Sunday, May 27, 2012
Graduation Cards
We had two great-nieces graduate together this year, so I made the same card twice, but personalized each with a chipboard letter for their name.
One of my most favorite types of cards to make is a criss-cross card. You can do so much with these cards - they can be very simple or quite elaborate. The final outcome looks a lot more complicated than it really is. :) There is a great tutorial by Beate Johns on the SplitCoast Stampers site - http://www.splitcoaststampers.com/resources/tutorials/criss_cross_card/.
Let me give you an extra hint about making this card. The instructions call for "One 4" x 5" piece of patterned paper". This paper is cut in half diagonally and used to decorate the front of the card. In the tutorial, Beate uses double-sided patterned paper. You MUST use double-sided patterned paper to make this work correctly. If you do not use double-sided patterned paper, you will need to have TWO pieces of 4"x5" patterned paper. Cut in each in half diagonally and use half of each to decorate the front of the card. With this in mind, it makes sense to make two of these cards at once; the extra one will come in handy!

For graduation cards, I always like to use the school colors, so these cards were made with black cardstock and a patterned (single-sided) paper pack from Hobby Lobby. On the belly-band, I used a Stampin' Up! graduation set (Go, Graduate) - I just love this image of the different graduating 'feet'. I stamped the image with Versamark and then embossed it with Stampin' Up! Cherry Cobbler embossing powder. For the embellishment on the belly band, I used some retired Stampin' Up! chipboard letters, pushed them into my Versamark pad so they got really well-coated with the ink, then embossed with the Cherry Cobbler embossing powder. While the first layer of embossing powder was still wet, I poured more powder over them for a second coating. I then took a red marker and outlined the edges so they wouldn't be the bare chipboard.
Hope you're enjoying the Memorial Day Week-end; thanks to all that have served our country!
Grad Card
I made this card for a Prairie Grove graduate. I used yellow glittery paper from Hobby Lobby and solid black cardstock.

This is a great technique for all those straps of paper we have.

This is a great technique for all those straps of paper we have.
Sunday, May 20, 2012
Cricut - Paper Dolls
In the last couple years, Cricut has come out with so many cartridges that it's tough to keep track. It's always easy to go for the newest cartride, and sometimes I forget about some of the great older cartridges. For a 2010 Halloween layout, though, I decided to use the Paper Doll Dress Up cartridge. Our youngest two grandchildren dressed as Mario (Super Mario Brothers) and a Pumpkin Fairy. By combining different cuts from the cartridge, I was able to create both images.
This first picture is of the grandchildren, and their respective 'paper doll' images follow. The faces are stamped with face stamps from Peachy Keen stamps (www.peachykeenstamps.com).


This first picture is of the grandchildren, and their respective 'paper doll' images follow. The faces are stamped with face stamps from Peachy Keen stamps (www.peachykeenstamps.com).


Tuesday, May 15, 2012
Cricut - Glitter Cardstock
For the Spring Croppin' Train Scrapbook Retreat, we created a "JOY" banner using a beautiful red glittered cardstock from Hobby Lobby. Here's a couple hints about using glittered cardstock in your Cricut:
1. Buy it on sale! At almost $2.00 per sheet, you'll definitely want to use either a 40% off coupon or wait 'till it's on sale for 50% off.
2. The glitter doesn't allow the Cricut blade to cut through the cardstock. The blade hits all that thick, crunch glitter, and isn't able to cut - sometimes it will just stick, and sometimes it will 'jump' and skip cutting lines. You'll need to turn your glitter cardstock over, so that your cutting blade is touching the reverse side of the cardstock, where there's no glitter.
3. Now the problem is that the glitter won't stick to the Cricut mat. You really need to tape this cardstock down. I was cutting an entire sheet of letters, so I taped down all 4 sides - I did not want that paper to move! I had a brand new mat, but I still used masking tape on all 4 sides.
4. The last clue here is - if you're cutting letters, don't forget to reverse your letters before you cut them. Unfortunately, yes, I do speak from personal experience - that's one sheet of glitter cardstock in the trash (at least I bought it on sale!).
This first picture shows the really pretty, thickly coated, red glitter cardstock that we used for this project.
The second picture shows a completely cut piece of cardstock, where you can see that the letters were cut in the reverse, and all 4 sides are taped. The tape, of course, took a few extra minutes to get off of my mat, but I'd rather spend a couple extra minutes peeling tape than re-cutting and wasting cardstock because it moved. I used my Gypsy, so I was able to get a couple extra letters on the mat.
Finally, you'll see a picture of the completed JOY banner.


Monday, May 14, 2012
Fall Retreat

We will be returning to the Embassy in Rogers.
We have expanded the hours... You can now crop from noon on Friday until 2pm on Sunday. That will give you 50 hours to scrapbook. Who needs to sleep anyway!
Check out the Pricing Post for more info on changes. *
Sign up now with the registration form here.
Pay your $50 deposit by July 1st.
Pay in full by September 22nd and receive the Early Bird Layout Kit at retreat.
Otherwise, registrations must be paid in full by October 15th.
*Due to rising costs, we will no longer
offer food as part of any of the Retreat packages. If we were to accept the
rate increases from area hotels, we would have to raise the registration fee to
at least $295. We’re certain you can each eat for less than $80, so we chose to
exclude any food options. Remember, however, that breakfast is
included if you are staying at the hotel.
We will provide Dining Car delivery
service from a designated location for anyone not wanting to leave the Retreat.
We have some exciting things planned for this Fall Retreat. Some new activities... some updated activities... and more surprises...
You will not want to miss this!
Thursday, May 10, 2012
Sunday, April 29, 2012
Signed, Sealed and Delivered
Dora here...
Did you hear that I have earned a spot on the Signed, Sealed and Delivered Creative Woman Design Team. (We will call it CW for short). You will want to friend them on Facebook and check out their blog once and a while to see what we are creating. Our first monthly project is due the end of May so you should be seeing it in June. I don't think I am allowed to post my projects here, so make sure you check them out.
I am so excited for the challenges that lie ahead. It should help me stretch my creative box. :)
Dora
Sunday, April 22, 2012
Glimmer Mist Organization
I have too many Glimmer Mists to fit in my previous organization. So today I purchased a rack to hang on my studio door.
The top shelf is my duplicate colors, Glaze and Chalkboard.
The second and third shelf is all mist, grouped by colors.
The fourth shelf is all the blue mist and the Glam.
The basket are all the brand new glimmer mist colors I have. I still need to label their lids.

Below is a close up of how I label my bottles. I write the name on a label, mist it then stick it on top of the lid.

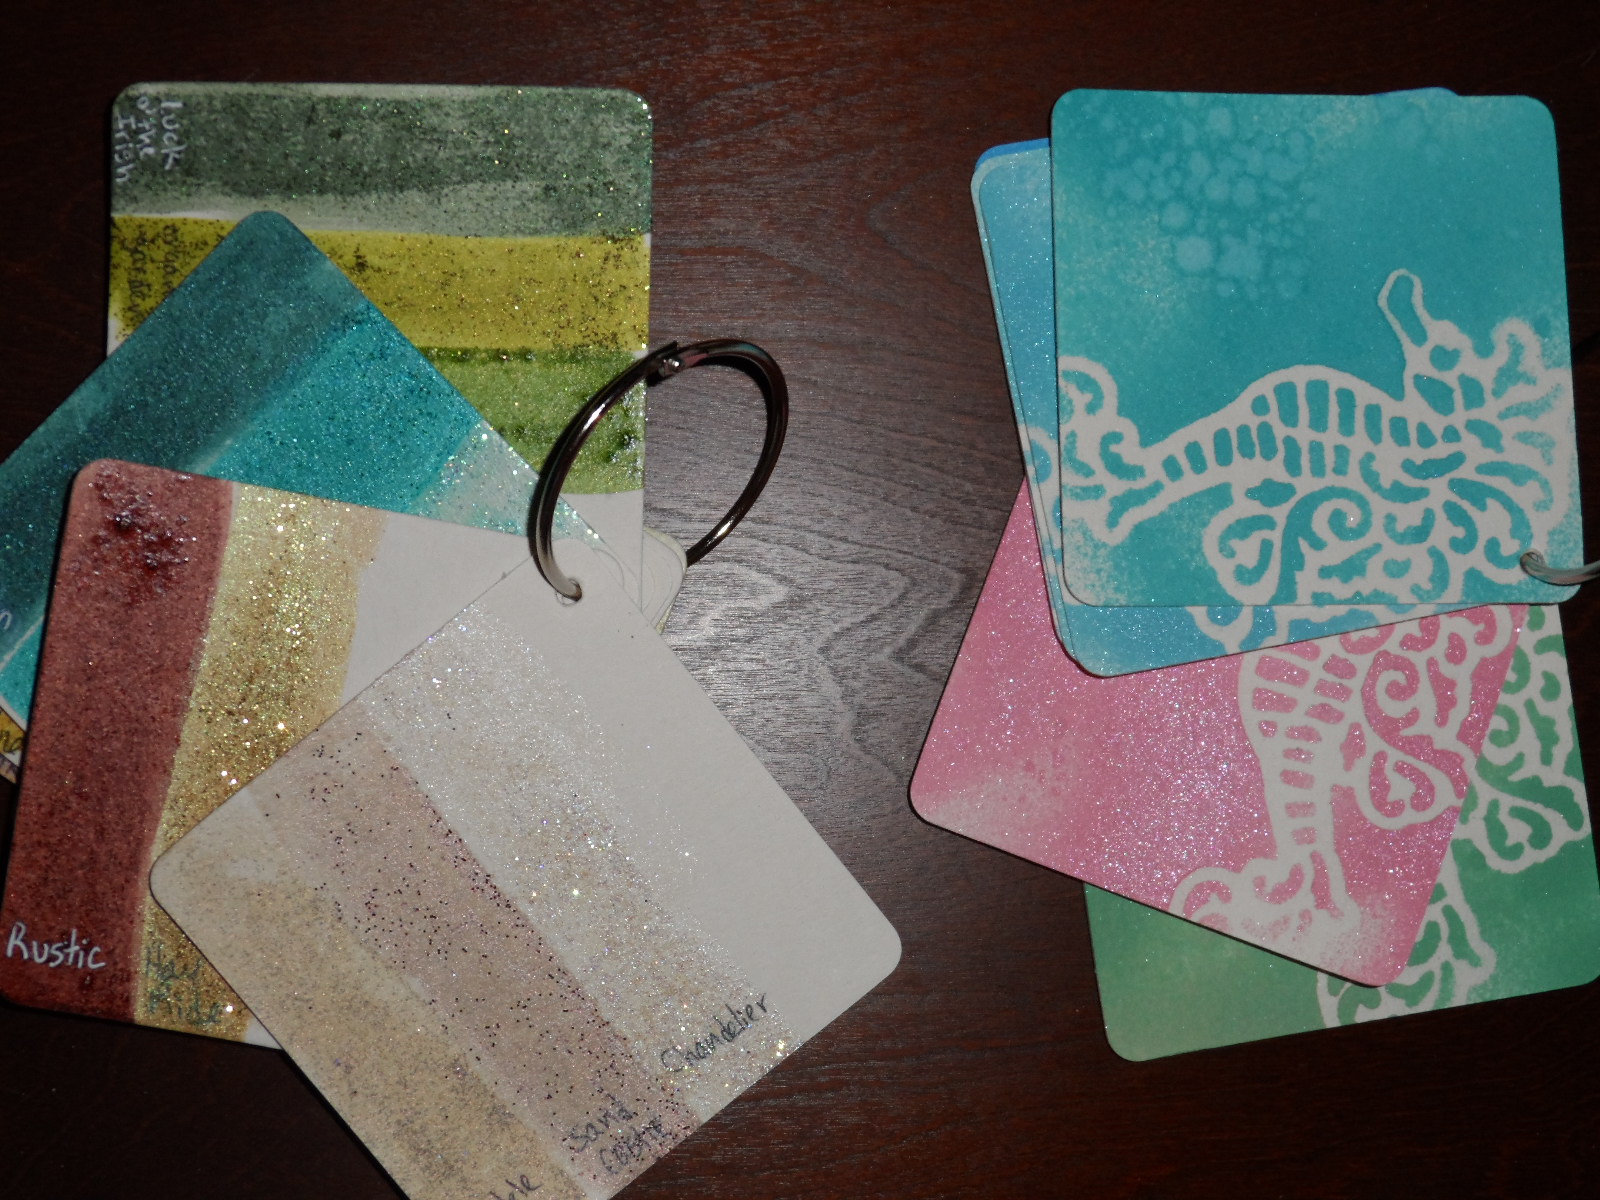
Another thing I do so I know what colors I have is... I take a round coaster and place a screen on half of it. Then I mist it. I write the name on the back of the coaster and group the colors on rings.


I purchase white ribbon, fibers and flowers now. Why buy colored when I have this many glimmer mists to color my own.
I am addicted - but at least I use them and not collect them. :0) It takes a lot to empty a bottle and I have emptied a few.
The top shelf is my duplicate colors, Glaze and Chalkboard.
The second and third shelf is all mist, grouped by colors.
The fourth shelf is all the blue mist and the Glam.
The basket are all the brand new glimmer mist colors I have. I still need to label their lids.

Below is a close up of how I label my bottles. I write the name on a label, mist it then stick it on top of the lid.

Another thing I do so I know what colors I have is... I take a round coaster and place a screen on half of it. Then I mist it. I write the name on the back of the coaster and group the colors on rings.

For the chalkboard, I used square coasters and a different screen to make them stand out from the rest.
I painted lines of the Glam and Glaze on the square coasters. I have a coaster for each color group (green, blue, brown, etc)
I purchase white ribbon, fibers and flowers now. Why buy colored when I have this many glimmer mists to color my own.
I am addicted - but at least I use them and not collect them. :0) It takes a lot to empty a bottle and I have emptied a few.
Sunday, April 15, 2012
Easter Layout
This past week I took an Easter layout class at SSD. We used Canvas Corp paper.
 I used Orange Peel stickles to embellish the title, eggs and carrots. The "E" opens up to be a mini album to hold 3x3 pictures.
I pleated some orange ribbon across the bottom to add more texture. Some of the letters and the rabbit and the orange egg are on dimensionals.
This was a fun layout to do with great paper.
Sunday, March 25, 2012
Layouts from the head
I actually have a couple layouts that are somewhat original designs. This one is from a Build a Bear party. The pictures from Build a Bear are always so yellow, so I had a hard time scrapping this one. I saw someone else had used this teal patterned paper and I knew that is what I wanted too. On the left page where he is stepping on the pedal, it opens up to show two more pictures. I made a loop of bakers twine and made my own paper bead as the opener. I wasn't at home when I did this layout so I needed to make due with what I had. I don't think I have even made a paper bead for a layout before. Good to stretch the brain. :0)

The patterned paper was the deciding factor on this page. The dots are glittery and I thought it was a perfect jacuzzi paper for my pictures. Then I outlined my title with a glittery pen to add a little bit more. Who says you can't have glittery on a boy page.


The patterned paper was the deciding factor on this page. The dots are glittery and I thought it was a perfect jacuzzi paper for my pictures. Then I outlined my title with a glittery pen to add a little bit more. Who says you can't have glittery on a boy page.

Sunday, March 18, 2012
More purchased kits
I purchased this layout online. It uses Bo Bunny paper. This was a fun layout to do. I tore, stitched, inked, curled, and tucked away. So much going on here.
Great paper to showcase the few of millions of faces my nephew makes. These are all posed pictures too. He is so funny. When I tell him that, he says "I was born that way"

This is a layout kit I purchased from 2KatieDesigns. It was originally a FAIR layout but I thought it was great for the Cave Springs Day pictures I had. I had to make this a four page layout. Too many activities for two pages.

Thursday, March 15, 2012
Sneak Peak of the Early Bird Layout for Spring Retreat
 Layout with grays, black, white and shimmer. Learn to pleat and make rolled flowers.
This layout is for five 3x3 pictures and one 6x6 pictures (or four more 3x3 pictures).
Wednesday, March 14, 2012
Sneak Peak of the Banner Layout for Spring Retreat

This is a layout with yellows, denim blues, light teal, khaki, gray , white. There is room for two 4x6 photos and two 3.5x5 photos or more of a smaller size. Plus lots of banners.
Sunday, March 11, 2012
Layout Kits
This layout is one I did at CKC Tulsa 2010. It is such a simple design but I really love it and the patterned paper used.


I purchased this layout already put together. I just needed to put pictures on it. I don't normally do that but I just loved the simple layout of this one and it worked good with these 1st birthday pictures.

Thursday, March 8, 2012
2KatieDesigns and the Spring Retreat
2KatieDesigns will be teaching TWO fantastic layout classes at the Spring Retreat.
Sports Layout : great layout for ANY boy or girl team sport from soccer to basketball to the backyard sports


Sweet Girl Layout : Great layout for your precious little girl photos or even pictures of your scrapbook weekend.


The cost is $15 for each class. Sign up using the paypal buttons on the right side of this page.
There are only 24 seats available for each of these layouts. Pre-register now before they are SOLD OUT.
Sunday, March 4, 2012
Layout Inspired from Store Display

This layout was inspired by a display in a closing scrapbook store. This is not my normal colors but I really like it. It is pictures of our last trip to CKC in Tulsa. What I did on this page that I don't always think of doing is where the circles are. The circles are from a patterned paper of circles. I just cut at the edge of one of the rows. Simple but easy to forget.
Sunday, February 26, 2012
Wow CHA is great
The last day we went to Newport Beach. We cannot be that close to the beach without a visit.


Sunday, February 19, 2012
Even More CHA Tidbits
This is the back side of the Convention Center sign we saw every day on our walk. Pretty clever to make it "A" shaped.
I was so excited to have my picture taken with Cricut. It is so much fun!
Tune in next week for more excitement.

I was so excited to have my picture taken with Cricut. It is so much fun!

Tune in next week for more excitement.
Sunday, February 12, 2012
More CHA Tidbits
This was our walk every morning. Just awesome. Loved the view. It is so different then home and I really like that. It was also great weather for a morning walk.


The second day we took a class from Little Yellow Bicycle. First we did a layout out and a card.

Little accordion book on the page...
This is a 5x5 card with the same bow technique as the layout page.
This is the first page from a "Medley Album Kit" we did using my favorite "Saturdays" paper collection. The smaller blue tag is page 1. There are two white daisies layered with a blue lollie on top. Then some trendy stick pins stuck in there. This is the last page of the album. It is an envelope with an insert. We stuck a couple of tags on there, a sticker, a dark blue lollie and some more stick pins.
We will have this album on display at the Spring Retreat.
Tune in next week for more excitement.


The second day we took a class from Little Yellow Bicycle. First we did a layout out and a card.

Little accordion book on the page...

This is a 5x5 card with the same bow technique as the layout page.

This is the first page from a "Medley Album Kit" we did using my favorite "Saturdays" paper collection. The smaller blue tag is page 1. There are two white daisies layered with a blue lollie on top. Then some trendy stick pins stuck in there.
 This is the last page of the album. It is an envelope with an insert. We stuck a couple of tags on there, a sticker, a dark blue lollie and some more stick pins.
We will have this album on display at the Spring Retreat.
Tune in next week for more excitement.
Sunday, February 5, 2012
CHA Tidbits
Our first time to attend CHA in Anahiem was amazing. The area of Anahiem was very nice.


The first night we took a class on heat embossing. The reason we took it was to use the Basically Bare album. Awesome!
This is all the product we received for the class: a heat gun, 6 embossing powders (EP), a case to put them in, 3 ink pads, 3 adhesives, glimmer mist, 2 stamp sets, plus the paper and album for the project itself... and more.

This is the 6 pack case we received in class. We will have the 12 pack case for sale at the Spring retreat.

This is page one of the album we made. The dress form is a corrugated die cut piece. We embossed the bodice and the stand. We adhered paper for the skirt then tied toile around the waist. The page itself has an opening in the middle. We used an embossing pen around the edge and heat embossed copper on it.
This is the second page. We heat embossed one of their stamp desgins. It shows through the cover. We cut the clock out of the patterned paper and edged it with the embossing pen and copper EP.

This is one of the pages inside. We inked a piece of bubble wrap with versamark and stamped it on the paper then heat embossed it.
The heart is corrugated. We versamarked the whole piece then sprinkled olive EP on it then copper EP. After heat embossing it, I added more olive EP.
 We will demo heat embossing at the Spring Retreat and will have some embossing powders for sell. You will want the embossing pen!
This is all the product we received for the class: a heat gun, 6 embossing powders (EP), a case to put them in, 3 ink pads, 3 adhesives, glimmer mist, 2 stamp sets, plus the paper and album for the project itself... and more.
This is the 6 pack case we received in class. We will have the 12 pack case for sale at the Spring retreat.
This is page one of the album we made. The dress form is a corrugated die cut piece. We embossed the bodice and the stand. We adhered paper for the skirt then tied toile around the waist. The page itself has an opening in the middle. We used an embossing pen around the edge and heat embossed copper on it.

This is the second page. We heat embossed one of their stamp desgins. It shows through the cover. We cut the clock out of the patterned paper and edged it with the embossing pen and copper EP.

This is one of the pages inside. We inked a piece of bubble wrap with versamark and stamped it on the paper then heat embossed it.
The heart is corrugated. We versamarked the whole piece then sprinkled olive EP on it then copper EP. After heat embossing it, I added more olive EP.
 We will demo heat embossing at the Spring Retreat and will have some embossing powders for sell. You will want the embossing pen!
Tune in next week for more excitement.
Subscribe to:
Posts (Atom)